Rust on a patio chair often begins as a small orange bloom beneath a chipped armrest or around a welded joint. Left alone, it can spread under the paint and leave rough flakes on cushions and hands. The best fix depends on the chair’s metal, coating, and rust depth. Steel, aluminum, and painted finishes do not respond identically, so test a hidden spot before using a cleaner or abrasive.
How to remove rust from metal patio chairs? Start by identifying the material, then brush away loose rust with a hand brush or fine abrasive pad. Wear gloves and eye protection, and work outdoors. For light surface rust, a mild cleaning solution and careful sanding may be enough. Deeper corrosion may need a rust remover suitable for the chair’s metal, followed by thorough drying and a compatible primer and outdoor paint. Do not assume a shiny surface is protected. Bare metal can flash-rust quickly in damp air.
Corrosion engineer Dr. Robert Baboian’s published work focuses on corrosion prevention and control. A practical takeaway from that field is to remove unstable corrosion and protect the exposed metal, rather than simply painting over flakes. Small details matter: inspect screw heads, leg ends, and joints where water collects. Keep the chair dry between steps. That part is easy to rush. This guide will compare removal methods, safety precautions, and finishing options, while noting when rust damage may be too deep for a dependable cosmetic repair. A little uncertainty remains: older chairs can hide corrosion beneath intact paint, so inspect carefully before choosing a method.
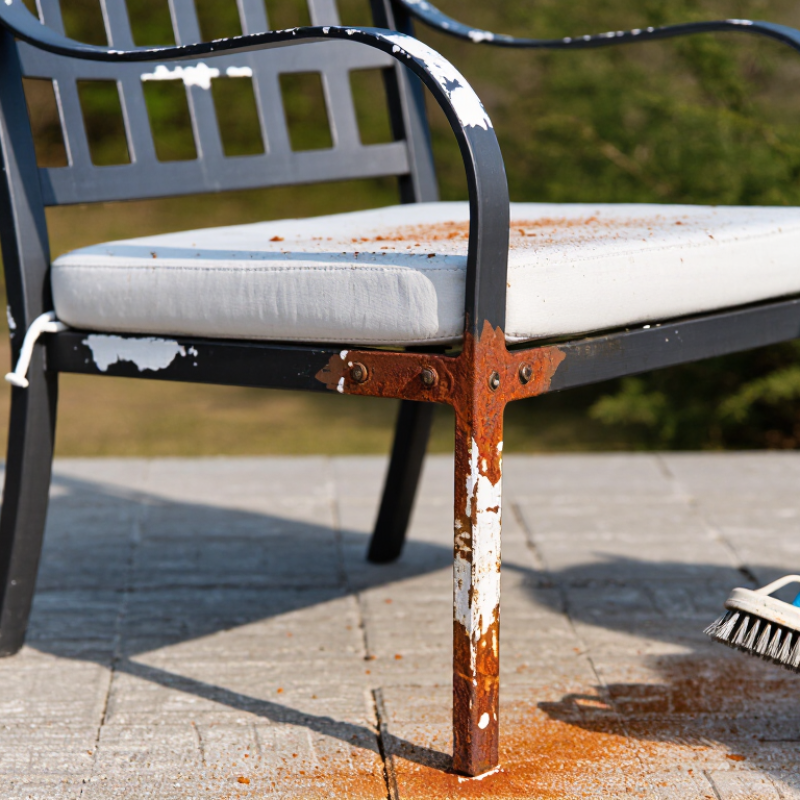
Before removing rust, identify what the chair is made from. Steel and iron develop reddish-brown rust, often around welds, screw holes, and chipped paint. Aluminum does not rust in the same way; its corrosion may look like dull white or gray powder. Stainless steel can also corrode, especially where dirt and moisture collect. Check the product label if available, then inspect a hidden area, such as the underside of a seat or leg.
Look closely. Use a flashlight to examine joints, feet, and the undersides of armrests. Surface rust usually appears as a thin, flaky layer, while deeper damage may leave pits, swollen seams, or holes. Press gently around suspicious spots with a cloth-covered fingertip. If the metal flexes, crumbles, or feels unusually thin, the chair may be weakened. Cosmetic rust and structural damage are not the same problem.
Paint can disguise the metal beneath it, so do not assume every dark patch is rust. A small, discreet scrape may reveal the underlying surface, but avoid scratching through sound protective coating. Note where rust appears and whether it returns near joints or trapped debris. It is easy to underestimate damage under a seat. If a leg or support looks compromised, pause before sanding; restoring the finish will not restore lost strength.
Use this density reference as a starting point when identifying a chair’s metal. Steel, cast iron, and stainless steel are iron-based and can develop rust, while aluminum forms a protective oxide layer instead. Confirm the result with a magnet, surface appearance, and a small concealed-area inspection before selecting a rust-removal method.
Before removing rust from metal patio chairs, set out a stiff nylon or wire brush, hand scraper, medium-grit sandpaper, clean rags, and a waste container. Wear safety glasses and sturdy gloves; use a well-fitting particulate respirator when sanding, and work outdoors. Keep dust away from food, children, and pets.
A 2016 IMPACT study commissioned by the corrosion industry estimated corrosion costs at US$2.5 trillion annually worldwide, about 3.4% of global GDP. That figure covers many industries, not patio furniture, but it shows why early rust control matters.
Check the chair’s finish before choosing a brush. A small test on a hidden spot can reveal whether the coating flakes or scratches. Brush loose rust gently, then sand remaining rough patches until the surface feels even. Don’t rush this part.
Wipe away dust with a damp rag and let the metal dry fully before applying a rust-inhibiting primer suitable for the chair’s material. Avoid breathing sanding dust, and follow the product’s label for ventilation and protective equipment. I sometimes find one stubborn orange seam after cleaning; inspect joints and undersides before calling the surface ready.
Tips: Keep a separate rag for dust, and replace sandpaper when it clogs. Dust travels. Store tools dry, and bag rusty debris rather than brushing it onto the patio.
Move the patio chair to a dry, well-ventilated spot, then remove cushions, plastic caps, and any detachable parts. Check the frame closely for flaking paint, deep pitting, loose joints, or thin, weakened tubing. Rust near a weld deserves extra care. A chair can look sturdy and still have a fragile spot underneath. Wear safety glasses and gloves; a dust mask helps keep rust particles out of your lungs. Work outside. Place a drop cloth beneath the chair to catch debris and protect paving or soil.
Brush away loose rust with a hand wire brush, using short strokes and light pressure. Start on a hidden area to see how the finish responds. For narrow corners, use a small brush or folded abrasive paper rather than forcing a large tool into the joint. Scrape only paint that is already lifting. Don’t grind aggressively: thin metal can lose strength, and sound paint may chip. Wipe the frame with a dry cloth, then inspect it again in bright light. I’ve found that dust can disguise small flakes, so check the underside and around bolts twice. If the metal feels soft, has holes, or sheds rust in thick layers, pause before refinishing; surface cleaning may not be enough.
After removing loose flakes, inspect the chair in bright daylight. Rust often hides beneath curled paint, especially around welds and leg joints. I use a stiff nylon or wire brush, then sand the edges until they feel smooth. Do not polish only the visible orange spots. Rust can remain inside tiny pits. Wipe the surface with a clean, slightly damp cloth, then let it dry completely. Moisture trapped under coating will restart corrosion.
Tips: Wear gloves and eye protection. Work outdoors or in strong ventilation. Apply a rust treatment only after reading its label. A converter can stabilize deep pits, but it will not rebuild missing metal. I once underestimated a small rust bubble near a seat joint. It returned within weeks because I painted over damp residue. That mistake changed my process.
Treat remaining rust with a thin, even layer of rust converter or a metal primer suited to the chair’s surface. Allow the stated curing time, even if the area feels dry. Lightly sand rough primer, then remove every trace of dust. Apply several thin paint coats instead of one heavy coat. Thin layers reduce runs and preserve the chair’s original contours. Check the underside and drainage points, too. The finish may look imperfect at first, particularly over pitted steel. That is normal. Let each coat harden before handling, and inspect the joints again after the next rainy day.
After removing rust, let the chair dry completely, including joints and the undersides of seat slats. Trapped moisture can undermine a fresh coating. Brush away dust, then wipe the metal with a clean cloth as directed by the finish manufacturer. On steel or iron, choose an exterior coating labeled for that metal and patio use. If the chair has a factory coating, check that the new finish is compatible. A small test patch can reveal peeling or poor adhesion before you coat the whole chair.
Apply thin, even coats rather than one heavy layer. Work outdoors or in a well-ventilated area, and follow the product’s instructions for temperature, drying time, and protective equipment. Pay attention to welds, bolt heads, and the feet; water often lingers there. Let it cure fully before putting cushions back or leaving the chair in rain. Thin coats work. A slightly uneven sheen can happen, especially around curved joints, and adding more paint may make it worse. Inspect the chair after wet weather and touch up chips early. The finish slows rust; it cannot prevent every scratch or damp patch.
| Step or Method | Best For | How to Do It | Important Considerations | Protective Finish |
|---|---|---|---|---|
| Identify the metal and assess the damage | All chairs, before choosing a removal method | Check the chair’s care information if available. Red-brown flaky rust usually indicates corrosion of iron or steel. Aluminum does not develop red iron rust; it can form a dull, chalky oxide instead. | Do not assume every metal chair needs rust treatment. Stop if the metal is cracked, perforated, or structurally weakened; cleaning cannot restore lost strength. | Choose a coating suitable for the chair’s metal and outdoor exposure. |
| Wash and dry | Dust, dirt, loose grime, and surface contaminants | Wash with mild detergent and water using a sponge or soft brush. Rinse and dry thoroughly before abrading or coating. | Remove cushions and protect nearby plants and surfaces. Avoid trapping moisture under a new coating. | Apply a finish only to a clean, completely dry surface. |
| Wire brush and sand | Light to moderate rust on accessible steel surfaces | Remove loose rust and flaking paint with a hand wire brush or suitable power-tool attachment. Sand the remaining rust and feather the edges of sound paint. | Wear eye protection, gloves, and a dust mask. Use controlled pressure to avoid gouging thin tubing or damaging surrounding surfaces. | Remove sanding dust; prime exposed steel with a compatible rust-inhibiting metal primer, then apply an exterior metal topcoat. |
| Use a hand sanding pad or abrasive sponge | Curves, joints, and areas where a power tool is difficult to control | Work along the metal surface, changing to a fresh abrasive section when it becomes clogged. Brush or wipe away residue afterward. | Rust often collects around welds and fasteners. Inspect these areas carefully and do not sand so aggressively that the metal becomes thin. | Prime bare steel and coat according to the product label, including its recoat and curing instructions. |
| Apply a rust remover or converter | Rust remaining in pits or hard-to-reach details after loose scale is removed | Use a product specifically labeled for the chair’s metal and follow its surface-preparation, application, and cleanup directions. | Products differ: some dissolve rust, while converters react with remaining rust. Do not mix chemicals, and use the ventilation and protective equipment stated on the label. | Check whether the treated surface requires rinsing, drying, or a primer before painting; follow the product instructions. |
| Prime and paint | Cleaned steel with exposed bare metal | Apply a compatible exterior metal primer in even coats, then an exterior metal paint. Coat edges, joints, and previously rust-prone areas without creating runs. | Apply only within the temperature and weather conditions on the label. Allow the stated drying and recoat times; dry-to-touch does not necessarily mean fully cured. | The primer and topcoat form a barrier that limits contact with moisture and air. Inspect and touch up chips as needed. |
| Routine inspection and upkeep | Chairs exposed to rain, humidity, or frequent outdoor use | Check periodically for chipped paint, scratches, and rust around joints. Clean off dirt and address coating damage before rust spreads. | Keep the chair dry when practical and avoid storing it where water collects. Follow care instructions for any cushions or mixed materials. | Repair damaged areas with compatible primer and topcoat rather than painting over loose rust or peeling paint. |
Key point: For most rusted steel patio chairs, the practical approach is to remove loose rust, clean and dry the surface, then prime exposed steel and apply an exterior metal topcoat. Always follow the coating and rust-treatment product labels.
Check its label, then inspect a hidden spot under the seat or leg. Steel and iron often show reddish-brown rust. Aluminum corrosion may look like dull white or gray powder.
Surface rust is usually thin and flaky. Pits, holes, swollen seams, or metal that flexes under gentle pressure may signal structural damage. Look closely.
Inspect the weld and nearby tubing carefully. If the metal feels soft, crumbles, or looks unusually thin, pause before sanding or using the chair. Paint cannot restore strength.
Move it to a dry, well-ventilated spot. Remove cushions and detachable parts, and place a drop cloth beneath the frame. Wear gloves and safety glasses; a dust mask can help.
Use a hand wire brush with short, light strokes. Try a small brush or folded abrasive paper around narrow joints. Avoid aggressive grinding.
Scrape paint only where it is already lifting. Test a hidden area first, since sound paint can chip. I might miss flakes under the seat, so check there twice.
Let the chair dry fully, including joints and seat slats. Choose an exterior finish suited to the metal, then apply thin, even coats. Test a small patch first.
Follow the finish’s drying and curing instructions before replacing cushions or exposing the chair to rain. Inspect it after wet weather and touch up chips early. A slightly uneven sheen may remain.
This guide explains How to remove rust from metal patio chairs? safely and effectively using a practical, step-by-step process. Begin by identifying whether the chair is made of steel, iron, aluminum, or another metal, since each surface may react differently to rust treatments. Carefully assess how deep and widespread the corrosion is before choosing your cleaning method. Gather suitable tools, such as gloves, eye protection, brushes, scrapers, cleaning cloths, and rust-removal supplies. Move the chair to a well-ventilated work area, protect the surrounding surface, and remove loose dirt, flaking paint, and unstable rust.
After the surface is prepared, treat the remaining corrosion with an appropriate rust converter or gentle removal method, then clean and dry the chair thoroughly. Repair small surface imperfections if needed and apply a suitable primer and protective finish. Regular inspection, prompt touch-ups, and keeping the chairs dry will help prevent rust from returning and extend their outdoor service life.

GIVANI Furniture